How each robot turns a command into motion, from the highest level we can command down to the motors.
M20 Pro
DEEP Robotics’ M20 SDK repository exposes three levels of control:
- High level: a body-velocity interface (forward, lateral and yaw rate).
- Mid level: a joint-angle and wheel-velocity interface, which the RL locomotion policy drives.
- Low level: a motor SDK for commanding the joint motors directly.
1. High level: body velocity
The simplest way to control the M20 is to send it a body velocity. The command comes from a user or a planner and generally feeds a locomotion policy, which works out how to move the joints (see the next section):
| Command | Training range |
|---|---|
| vx (forward) | ±2.0 m/s |
| vy (lateral) | ±1.0 m/s |
| wz (yaw rate) | ±2.0 rad/s |
There is no command for body height, pitch, gait or mode. The controller app, our planners and the m20-android-sdk all work at this level.
2. Down to the joints: the RL policy
A reinforcement-learning policy turns the velocity command into joint targets. At each step (50 Hz), it reads the command and the robot’s state and outputs 16 targets, one per joint. A PD controller turns those targets into motor torques at 200 Hz.
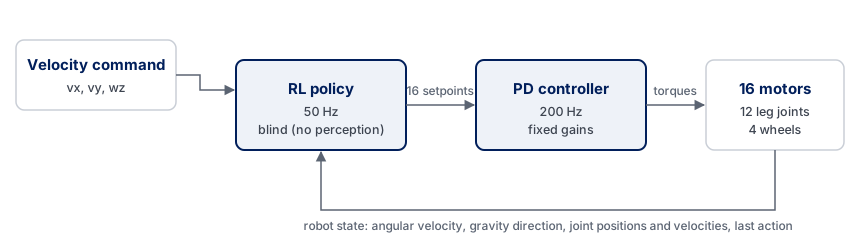
| Joints | The policy sets |
|---|---|
| 12 leg joints (hip ×2 and knee, on each leg) | A target angle for each joint |
| 4 wheels | A target speed for each wheel |
Working at this level means writing our own policy or controller that outputs joint angles and wheel speeds in place of DEEP Robotics’ one, while the PD loop stays the same.
3. Low level: the motors
Below the PD loop, the motor SDK would let us command each joint motor directly. With access to it, we could replace the PD loop as well and run our own low-level controllers, such as torque control, on all 16 joints.
X30 Pro
X30 control interface to come.